DSMTalk Forums: Mitsubishi Eclipse, Plymouth Laser, and Eagle Talon Forum banner
1 - 20 of 34 Posts

4SFED4

· Elite DSMtalker
Joined
·
1,286 Posts
I finally purchased a Buschur Racing alternator relocation kit for my race car. For $180 you would expect a belt option and instructions. Although it is fairly simple to figure out.

There have been so many inquires about this kit and very little feedback given, let alone any detailed pics. I hope these pics and short notes help answer some questions that have been unanswered for years.

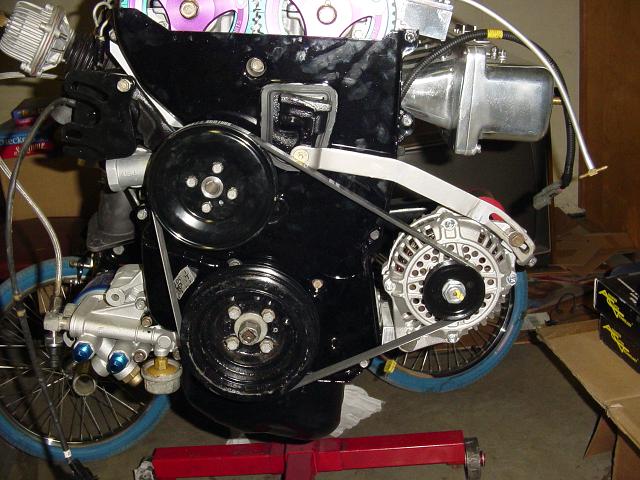
This is the kit installed.
Image


This was my primary test fit with the adjustment bolt in the hole as deep as it will go. You will notice the lack of adequate clearance.
Image


This is another shot of the kit by itself after the test fit. It depicts where the alt pulley hits the frame horn.
Image


The final test fit after some modification with a ballpeen hammer. It doesn't look like much differance, but I am now able to squeeze a belt around the pulley without removing the alternator.
Image


I have not found the proper belt length to utilize the factory water pump, but I will update the thread with a part#/belt size when I find it.
 
It should easily clear the frame rail without any need for persuasion.

I'd verify the car has no front end damage and make sure the motor mounts are in good shape.

I've put these in 1g's without any modifcation, and in 2g's with a LOT of modification.
 
Discussion starter · #6 ·
thimages said:
I'd verify the car has no front end damage and make sure the motor mounts are in good shape.
I have owned over twenty 1G DSMs. This particular car has been in my pocession for 8 years. It only had 120K on it when I got it with a straight body and decent paint that matched. The fenders are OEM with the DSM stickers and no wierd overspray.
I have dented some of the panels, but nothing major to the frame. The dented, ragged doors and skirting are not original to the car and are form a 1Gb Talon. I have a pristine set ready to go on when I repaint the car. The current doors were test pieces for weight savings.
It also has properly installed Prothane motor mounts.(I've seen that screwed up before)
 
mdtalon901 said:
How hard was the 2g installation?
It depends on if you want to keep the power steering/oem water pump.

Remove material from front end of bracket, weld it to the rear.

That moves the alt. back so the rear crank pulley grooves will drive it.

Move P/S pump out the same amount, use one belt to drive both pumps from the front crank pulley grooves.

Hal
 
Discussion starter · #9 ·
My main reason is to have more room and a less aggressive bend in my downpipe.
Heat is also a factor if you have an unshielded/unwrapped downpipe that will shorten the life span of your alternator.
 
Discussion starter · #17 ·
treebonker said:
Is there a thick bushing you remove where the intermediate shaft bolts on the block(white boxed area)?
From the factory the A/C bracket fills that void. Before I had the kit I had cut that ear off an A/C bracket to fill the gap.

I have yet to drive the car since installing the kit due to other changes I am making. However the pulley alignment seems to be perfect.
 
I'm using this kit and deleted the p/s for the same reasons. My O2 housing has gradual bends, plus there's a ton of room to work. A t-belt swap is now a 20 minute job.

I found the 420 belt to be too long. The 410 belt was a very snug fit but it worked.

I ran into the same issue with the pulley hitting the frame rail. To fix it without the use of a hammer, pivot the bracket clockwise using the bolt hole closest to the timing belt as the pivoting point. I found I also had to grind away a corner of bracket where it steps down for the carrier bearing in order for it to fit without grinding the carrier bearing itself.

If you use this pulley with an aftermarket damper like the ATI, you will have to find an even bigger belt. I'm in the process of doing this and am thinking the 420 or 430 belt will work.
 
1 - 20 of 34 Posts